Wednesday, March 6, 2013

New kitchen - part 3

Remember that I mentioned we had major problems with our old kitchen?

1. Made in the 90's - check
2. Bad placement of the fridge
3. Stupid corner

The fridge
We needed to move the fridge. It blocked all traffic. Especially if it was open or if we were getting water or ice. It was right where the only passage into the rest of the house was.

So we decided to place it right at the entrance to the mudroom. Much less traffic! But then we got a new problem ...well several actually. First of all the depth of an american fridge is more than a standard fridge in Denmark. This problem we have learned to live with. The second problem was there is no IKEA cabinet to have it in. And why is that problem you ask? Well, we wanted to make use of the room over the fridge too. An american fridge is also shorter than the normal danish fridge so we had all that space over the fridge.

Lets place a cabinet there!! But a cabinet need to be hooked up to something and the wall just wouldn't do. So the carpenter suggested that we bought an extra side to a normal tall cabinets and we could make it look like it was a cabinet. Work like a charm:


We store pitchers and cookbooks up there.


The stupid corner.
The corner was a problem due to several reasons. Before the new kitchen the corner was where all the dirt ended up, including dog hair sand, you name it. It was very hard to clean because everything had to come out first. It was simply just a waste of space. And there is a chimney which can't be moved.

We ended up putting a cabinet in the corner with a lazy susan and on top we placed a cabinet with a door that sort of rolls up. My idea was that is was a small appliance garage so we added extra electrical sockets there too. Appliances with all the cords are just messy to look at so I can now just roll down the door so I don't have to look at it.


 Now you see the mess
Now you don't

It even had a 10 cm opening at the end for cutting boards. Perfect. (notice the cabinet without the door over the oven - that was the last door we needed - it came up 2 months after the kitchen was done).

The oven/microwave tower presented a new problem. It sort of ended very abruptly. So we got another cabinet and asked the carpenter to cut in half.

The bottom part now serves a spot to hang dishtowels and cloths. The top part displays some our nicer china (Royal Copenhagen).


All in all it was a good experience ... afterwards. During especially the last month was testing. We had many issues with the carpenters and the electricians ... and the contractor. But all is well now and we love our kitchen. It has been "done" for 2 years but we just recently put in glass shelves in the cabinet for the china and there still needs a little thing before it is completely done.

The last thing we recently installed in the kitchen and the rest of the house was a central vacuum cleaner. Underneath the oven we have this thing:

We simply sweep all the crumbs and dirt over to it, flip the switch and it is gone. Love it!

The new kitchen part 1
The new kitchen part 2

New kitchen - part 2

With most of the cabinets in the carpenter started assembling the cabinets. That took longer than expected. I think most of the men who worked in there shared the idea that real men don't look at instructions ... so they had to redo a few of the cabinets.

The cabinets are in 

And then the doors ... 

And handles ... 

 And storage ... loads of it!

One of the lazy susan - making maximum use of the corner. 

And pull out drawers ...

Then the appliances began to be set in:
 Oven and microwave oven ... (in the stupid corner). The other lazy susan is placed in that corner.

And the fridge!

It was now time to have the counter top people come and measure the counter top area. 

We did have some debates about the counter top. On one hand we wanted something good but we were not made of money so we landed on a laminate counter top with a stone look to it. When we want to replace it with a real stone or something else we can. 


And then it was done ... in my next kitchen post I will share more on how we solved our main problems with the old kitchen.

The new kitchen part 3

New kitchen - part 1

We have had our fair share of insurance claims over the past four years. It all started with one of the kids bedrooms. We noticed a strange crack in the wall. The insurance company came out and told us that they wouldn't cover it.

But then our handyman showed him a problem we've had in the kitchen for years that was becoming worse. The floor was lumpy - don't know how else to explain it. We re-opened the hole we had made for the last insurance guy and he looked in and said that the floor was constructed in the wrong way. They would give us money to fix the floor but not for a new kitchen. We refused to put in the old kitchen again, which looked like this (sorry for the poor picture quality):


There were several problems with. First of all it was from the early 90's. We didn't really like the tiles. There was a corner that was just a waste of space, the fridge was a big american side-by-side fridge/freezer that we love but it was placed it a really stupid place where all the traffic was.

So I started to plan. We visited every kitchen company storea that we have in Denmark ... well not all of them but we did went to one of each. What we found was that they all had one or two awesome things and some things we hated. And they were soooo expensive. So we ended up in IKEA. In IKEA we could design at home with their nifty design program. I could pick cabinets, sink and storage solutions. That took a good few weeks. We were then left with two problems. We still wanted an american double fridge but no cabinets which it could fit in and we needed ideas for the stupid corner or rather confirmation that what I wanted was plausible to do.

Off too IKEA to plan and order. They have kitchen designers there so we got help to solve it all. 

We are not very handy with tools so we hired someone to fix the floor and put up the kitchen so meanwhile they started at home - this is after their first day:
And with in a week it looked like this:


We were so excited! Mainly because the idea of spending many months with this kitchen was a bit depressing:

Within two weeks the floor was done and all of a sudden we needed to hurry and order the kitchen parts from IKEA.


It was a loooong day in IKEA - it took us three hours to get everything on the carts and pay for it. We had four carts. And we couldn't even get it all. This was in the early spring and that winter we (and a lot of Europe) had a lot of snow. In one of the storage facilities that IKEA use the roof had caved in due to the weight of the snow and had ruined all the fronts for the cabinets that we needed. I went back to IKEA at least once a week for at least 6 weeks. 

But then the building of the cabinets could begin!!!

The new kitchen part 2

Wedding party outfits

I am a sucker for a good deal. My husband jokes that only 10% of my clothes has been bought at the full price ... true. A good deal is how I ended up with 6 meters of some lovely taft fabric. It sat in my very large pile of "oh this is nice fabric maybe I can figure out to use for something one day" (right next to the pile of the "oh these scraps are way to big to throw out maybe I'll find a use for them someday").

Then a wedding invitation came along ... and with my husband uemployed the taft seemed like the perfect way to get cheap but fancy clothes for the twins and me. Well, at first just me. But then I still had sooo much fabric. So I made a dress for my three year old daughter. And since I have twins I sometimes fall into the they have to match trap, so I made a little vest for my son too.

Then my husband looked left out so I made him a tie and a little handkerchief to match the rest of us.

The pattern for my dress I bought. I added the tulle on the top for a nice little effect. I also altered a pattern for a little jacket because 1. the danish summer weather can be tricky and 2. no bare shoulders in church. I felt creative and also made a little purse too.

The patterns for the little dress and vest I found in a magazine. The tie was a little challenging. I found a pattern but I still needed something inside to stabilise the tie. When the fabric is so delicate and fine then it won't look nice. I thought I did a good job but my husband thought it was a bit crooked. Hey it was my first tie! But he caved and wore it. I think we look lovely.


Tuesday, March 5, 2013

Cakes

A few years ago I started making cakes for the kids birthdays. I have always liked baking but to make the cake look like something other than a cake is so cool.

The twins 4th birthday
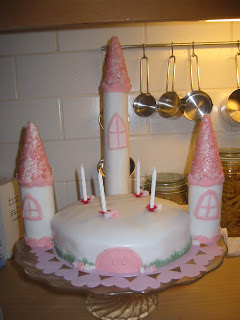
After attending a course in how to decorate your cake it was decided for the kids birthday I would make a train for Alexander and a princess castle for Emmeline. I have learned sooo much from that decision.
Alexanders train cake. It was a chocolate cake covered with brown fondant. The wheels were Oreos, the coal was colored sugar and the logs were candy.

Emmelines cake. The cake was a traditional danish birthdaycake - a layed cake. The towers were toiletpaperrolls covered in plastic and fondant. The top of the towers were papercones covered in plastic and fondant and rolled in colored sugar. 

1. PLAN - Instead of making it up as you go along plan everything that will be on the cake. It takes time to come up with ideas and to making them happen so I start several months in advance
2. Start early - making two cakes with that much decoration takes a lot of time. Most of the decoration can easily be done in advance. Its all the little details that take time.

For the twins 5th birthday I thought I was smarter. I made a Rapunzel house and a football cake. I knew I wouldn't have a lot of time so I bought more of the decoration instead of making it.

Emmelines Rapunzel cake: The cake was a plain white cake covered in fondant. It took forever to make the roof and I was soooooo grateful that I had bought the doll in advance - otherwise I wouldn't have made all the details on the house. 

Alexanders soccercake. A chocolate cake covered in fondant. I thougth I had bought a soccer decoration set but when I got home it was a hockey set. The goals I could use and I had a soccerball to use too.

3. When building a cake it needs support. I know duh ... I learned that the cake could only be leveled if the cake was even. It was supposed to be a tower but I couldn't figure out how to make the tower strong enough to hold the heavy cake.

Then I learned about rice crispy treats ... The next year I was a bit more ambitious again. A space cake for Alexander and a castle (again) for Emmeline:
Alexanders spacerocket. The cake was a white cake and a chocolate cake with toblerone filling and raspberry filling. Covered in fondant. The wings and top and the bottom was rice crispy treats.  

Emmelines castle cake. The towers was rice crispy treats covered in fondant. The walkway was sugar and the cake was a white layered cake with toblerone filling and strawberry filling.

4. Even rice crispy treats take time but they can be made a week in advance. All I had to do on the day of the party was to assemble the cakes. 
5. Heavy items need support. I still haven't figured out how to support the wings of the space rocket.

Making my husbands 40th birthday cake was in comparison much easier and less time consuming and it was nice to make a pretty cake instead of all the kiddy cakes.
Jans cake: A layered white cake with chocolate filling and strawberry filling. The little cake on top was the same. All of it covered in fondant. Little balls of plastic is holding up inside the bow.

This year Emmeline has requested cupcakes and a barbie theme. Alexander has requested another soccercake. Stay tuned :)